Strip out  tags before processing markdown See merge request svekyll/svekyll-cli!55 |
||
|---|---|---|
| src | ||
| svekyll | ||
| tests | ||
| .envrc | ||
| .gitignore | ||
| .gitlab-ci.yml | ||
| .npmignore | ||
| index.html | ||
| package.json | ||
| pnpm-lock.yaml | ||
| README.md | ||
| shell.nix | ||
| svekyll-cli.js | ||
| test-svekyll-cli.js | ||
| yarn.lock | ||
Svekyll
- Why Svekyll?
- Quickstart
- Building your blog
- Technical Notes
More information is at https://svekyll.com and https://blog.svekyll.com
Why Svekyll?
Svekyll takes the simple conventions of Jekyll and marries them to the incredible power of Svelte.
Read more here: https://svekyll.com
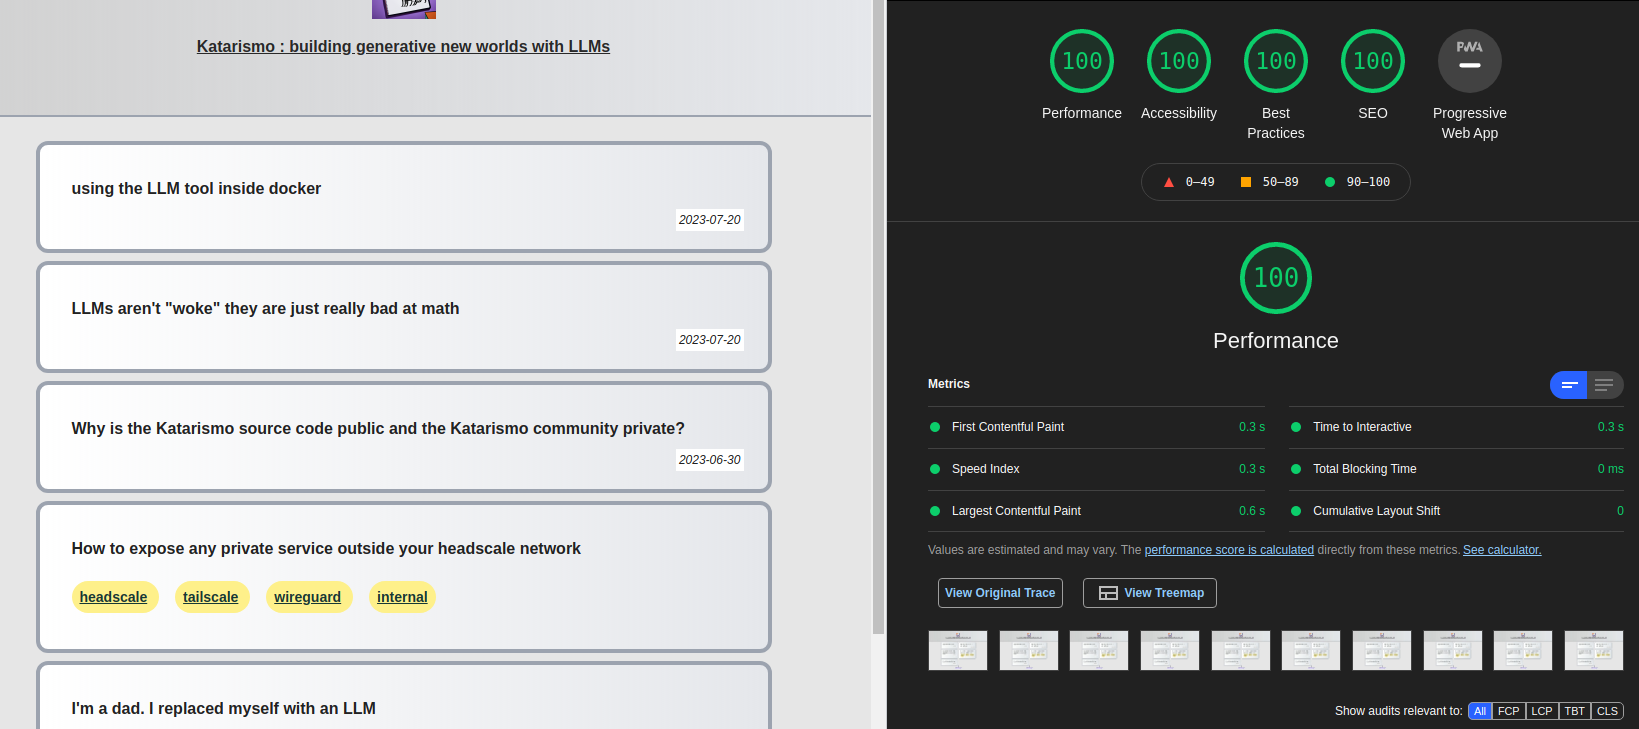
Svekyll achieves perfect lighthouse scores: all 100s
Quickstart
node --version  # Please use at least node 18

# Create a package.json with the right build command
echo '{ "scripts": { "build" : "svekyll-cli build && svekyll-cli finalize" } }' > package.json

# add svekyll-cli
npm add svekyll-cli

# make the posts directory
mkdir -p posts

# Create _config.yml: see https://svekyll.com/Config
echo -e "title: hi\ndescription: my blog" >> _config.yml

# Create a post
echo -e "---\npublished: true\ntitle: First post\n\n---\n\n# My first post\n\nWelcome to Svekyll" >> posts/2023-09-23-hello.md

# Build your blog
npm run build

# Optionally style using a user.css file: https://blog.svekyll.com/2021-11-13-hacking-svekyll-theme
# Or, use a theme in your _config.yml file https://svekyll.com/Theme

# Review your blog (or put up on any webserver as a static site)
cd build && npx http-server # Go to http://localhost:8080.
Read more at https://svekyll.com
Interesting in hosting? Contact chris@extrastatic.com to learn about https://extrastatic.com
Svekyll CLI
The original Svekyll was SvelteKit based. This meant a user had to use an entire full stack JavaScript system when the goal was to create a static blog. This was the wrong approach.
The new Svekyll uses a CLI tool much like the original Jekyll. Your project can be nothing more than a posts directory and a package.json file.
Sample package.json:
{
  "version": "0.0.1",
  "scripts": {
    "build": "svekyll-cli build && svekyll-cli finalize",
    "verify": "svekyll-cli verify"
  },
  "type": "module",
  "dependencies": {
    "svekyll-cli": "0.0.78"
  }
}
And, posts can be something like this:
$ ls -1 posts/
2023-05-26-i-m-a-dad-i-replaced-myself-with-an-llm.md
2023-06-04-expose-any-private-service-using-headscale.md
2023-06-30-why-is-gitlab-source-code-public-and-discourse-community-private-.md
2023-07-20-using-the-llm-tool-inside-docker.md
Each posts is a standard jekyll style post, but you can also add Svelte components using MDSveX.
$ cat posts/2023-07-20-using-the-llm-tool-inside-docker.md
---
title: "using the LLM tool inside docker"
published: true
date: 2023-07-20
data:
  a: 1
  b: 2
---

<script>
import MyComponent from './MyComponent.svelte'
</script>

Katarismo uses the excellent llama.cpp project. But, recently I've been reading about the LLM tool from the prolific Simon Willison.

<MyComponent {data}/>

I run NixOS as my \*nix of choice. But, python and nix's immutable file systems approach are like oil and water, so I generally like to run anything with Python inside a docker container.

This is the Dockerfile I used:
...
Building your blog
Once you have this structure, you can build it like this:
yarn # install svekyll and dependencies
yarn build
Then, look inside the build directory.
Technical Notes on Svekyll CLI
Svekyll CLI eschews the traditional JavaScript build system. Internally, svekyll-cli creates a vite configuration with the right plugins (like tailwind, postcss). It then generates a set of templates inside the root directory. Each of these is a standalone Svelte app, and then svekyll-cli compiles them using vite and svelte and the preprocessor. The result in the build directory is a series of index.html files with the JavaScript compiled, minimized, tree-shaken and inlined. This results in an incredibly fast experience for readers, but without compromises on the experience as you can use the full capabilities of Svelte.
Special Image Tags
Svekyll supports two ways to handle images specially:
1. Markdown Preview-Only Images
If you add images with the exact alt text svekyll-img, they will be removed during processing:

This is useful for adding images to your markdown that you only want to see when previewing the file locally, but don't want included in the final output.
You can disable this behavior in your _config.yml file:
svekyll_img:
  strip: false
When strip is set to false, all image tags will be preserved, including those with the alt text svekyll-img.
2. HTML Image Tags
Svekyll also supports a special <svekyll-img> HTML tag that gets converted to a regular HTML <img> tag:
<svekyll-img src="path/to/image.jpg" alt="Description"/>
This gets converted to:
<img src="path/to/image.jpg" alt="Description"/>
This is different from other svekyll tags (like <svekyll-map> which converts to <Map>), because the img tag works as is, and Map is a special Svekyll component that pulls in leafletjs to render maps.
For example, on a blog with four posts, this is the directory structure. This can be put on any static hosting service:
$ tree build/
build/
├── 2023-05-26-i-m-a-dad-i-replaced-myself-with-an-llm
│   └── index.html
├── 2023-06-04-expose-any-private-service-using-headscale
│   └── index.html
├── 2023-06-30-why-is-gitlab-source-code-public-and-discourse-community-private-
│   └── index.html
├── 2023-07-20-using-the-llm-tool-inside-docker
│   └── index.html
├── index.html
├── katarismo.png
├── page
│   └── 0
└── tags
    ├── headscale
    │   └── index.html
    ├── internal
    │   └── index.html
    ├── tailscale
    │   └── index.html
    └── wireguard
        └── index.html